Saturday, May 2, 2020

GRANNY CHAPTER TWO


It’s an escape game which give you 5 days time to get out from the house. In the house there are two characters: Granny as from the previous one and a new character Grandpa.

Both of them together keep you locked in their house. To survive you have to escape from the house within 5 days, these days are counted as chances.


If during escape you get caught by any of the character, then they hit you hard and you die. Granny hears everything as usual. The new character Grandpa doesn’t hear well but he hits hard.

In chapter two there are total three ways to escape:
  1. The Front Door
  2. The Boat
  3. The Helicopter
You required different items for different escape way. The key to success is “play in practice mode until you remember the exact item and hiding spots, and remember the map of the house


Location of the items changes randomly every time you play. Try checking all item spawn locations so that you don't miss any items.

Granny's house is made of 4 floors and 1 basement. You will wake up at 1st floor from where the game start. 1st floor is connected to second floor and basement.

Use basement only when you escape via boat. You don't have to go down if you choose to escape from electrified door.

Major way to get away from enemies is to hide are under the bed, hide in the locker, and hide in the small space where you have to crouch to get in. Enemies can't crouch to get you.

Even if you hide under the bed, if enemy is too close to see you hiding, they will still find you. Use Shotgun or Iron Maiden on the first floor and make loud noise to lure Granny and Grandpa.

For your help, map of different floors are provided below:

First Floor:

  • When you start the game, original position you start is the first floor. Check the map and efficiently collect all items. There is only two item spawn location in the first floor. Check all location quickly and go upstairs. You can't open the wooden box placed right in front of your starting point. You need Crowbar to open it.


Second Floor:

  • You can find hidden passage behind the book shelf. Simply press the different colored book in the book shelf. The passage leads you to Shot Gun but you need Weapon Key to unlock it.
  • You may find item inside of the piano or clock on the 2nd floor. Check by tapping on it.

 Third Floor:


  • On the left down corner of the map, there is a security room which has a ladder that leads to 4th floor. In order to enter, you need Security Key.


  • Near the dining table you can remove the wood plates which is blocking the entrance. Get close to the plates and move right.


  •                        Move the wood plate

    • As you can see from the map, the kitchen has many spots to search for items. Since it takes a while to finish searching, try having some distance from the enemies before searching this area.

    Fourth Floor:


    • The grated room on 4th floor can be opened by shooting the red button with Stun Gun or Shot Gun. There is chained shelf in the grated room and you need Cutting Pliers to unchain it.


                            Red Button

    Basement:


    • There is no item spawning in the basement floor. You only need to visit here once you have all the items to escape from the boat.

    Escaping through Front Door:

    The Front Door is located in the entrance in the middle of granny's house and can only be opened by taking off all the locks on it and putting the door handle back in the open slot to open the door itself and escape.
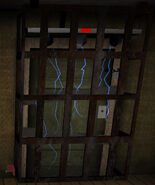
                                                     Front Door Without Screw Lock

    The amount of Locks on the Front Door depends on the Difficulty you are playing in :

    • On Easy Mode, there is a total of 5 Locks on the Front Door, being the Planks, the Electricity Lock, the Door Bars, the Regular Padlock, and the Door Handle's Slot.
    • On Normal Mode, the amount of Locks is the same as on Easy Mode.
    • On Hard Mode, there is a total of 6 Locks on the Front Door, being the Planks, the Electricity Lock, the Door Bars, the Screw Lock, the Regular Padlock and the Door Handle's Slot. Note that the Screw Lock has to be opened before the Door Bars can be opened.
    • On Extreme Mode, there is a total of 6 Locks on the Front Door plus 1, not in the Door itself, which still makes 7 Locks in total. The Planks, Electricity Lock, Door Bars, Bolt Lock, Regular Padlock and Door Handle's Slot are still there on the Door itself but the Special Lock also blocks the access to the Entrance, where the Door is.
    • If you are playing with Extra Locks enabled, the amount of Locks will be the same as on Extreme Mode, with a total of 7.


    Escaping :


    • The Crowbar is required to take down both of the Planks. Only a single hit per Plank is required, unlike in the previous Granny game.
    • The Padlock Key is required to open the Regular Padlock, on the top right.
    • The Cutting Pliers are required to disable the Electricity Lock. They are needed to cut the red wire, behind the red painting on the first floor, where the Electrical Box is, to disconnect the electrical current.
    • The Hand Wheel is required to open the Door Bars, by lifting them up. It has to be placed on the Crank Shaft, in the Basement to be opened. The Screw Lock must be opened before, if it is present on Door.
    • The Wrench is required to open the Screw Lock, by simply unscrewing the Screw that blocks the Door Bars from lifting up.
    • The Special Key is required to open the Special Lock, to remove the horizontal Bars, blocking access to the Entrance. It is located in the TV Room and can only be opened first, if it is present.


    Escaping through Boat:
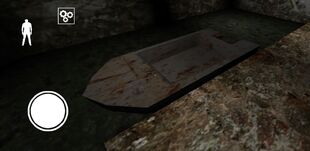
                                 

    The Boat can be used as an alternate escape method to the Main Door. Just like the original Car in Granny, the Player will need many different tools that spawn around the house which will all go to different parts of the Boat.

    If you want to use the Boat to escape, you will need following items:
    1. Gasoline Can to fuel up the tank of the Boat
    2. Spark Plug 
    3. Boat Steering Wheel to fix the unfinished engine
    4. Padlock Key to open the Sewer Gate and 
    5. Boat Key to start the boat.

    Escaping through Helicopter:
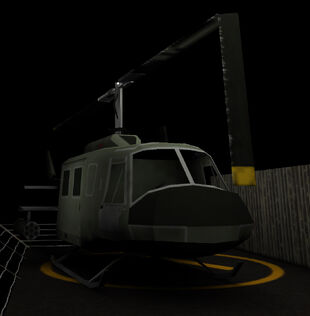
                                                       

    It was added in version 1.1 and is the third and newest way to escape Grandpa's House and beat the game. The Helicopter requires a grand total of 10 items to escape with, being the Security Key, the 3 Painting Pieces, a Weapon (which can either be the Shotgun or Stun Gun), the Glass Fuse, the Duct Tape, the Gasoline Can, the Helicopter Manual and finally the Helicopter Key.

    Escaping with the Helicopter is the hardest way to escape the House as it requires the widest variety of items. It is, however, safer than the Front Door and Boat escapes, as you will not have to worry about Granny or Grandpa while doing all the steps first to access and then fix the Helicopter since they all happen in the Attic. Here is a detailed list of all the steps to complete the Helicopter Escape, in the right order:

    Getting to the Helicopter Balcony:

    • The first step is to obtain the Security Key in order to access the Security Room, where the Ladder to the Attic is. To do so, you have to knock out Grandpa or steal it while he is asleep in the TV Room. But that step isn't new, you already know it.
    • The second step, once you've reached the Attic is to go to the Painting Pedestal Room and complete the puzzle by gathering the three Painting Pieces and place them on the pedestal. The completed painting, representing Grandpa, standing up in the TV Room on the PC version of the game will open the lock on the Door giving access to the next room.
    • The third step, once you arrived to the Shooting Gallery Room, is to bring the Shotgun NOT the Stun Gun and complete the Shooting Minigame by aiming correctly and knocking down all of the 3 moving targets in order to open the Door giving access to the next room. The Shooting Minigame features an Ammo dispenser, which can generate an infinite amount of Ammo, as long as the minigame isn't completed.
    • The fourth step, once you got into the Drop Trap Room is to find the Glass Fuse on place it in the Fuse Slot on the wall to be able to access the other side of the Trapdoor. Trying to walk through the room without putting the Fuse in its slot will result in the trapdoor opening, dropping the player into the Kitchen, stunning them for a few seconds before they can get back up and also alerting Granny. The red light above the Trapdoor turns green once the Fuse is in place.
    • The fifth step, once you enter the Helicopter Balcony and gain access to the Helicopter is to fix and start it. This requires a total of 4 more items, which can be used in any order, except for the Helicopter Key, which has to be used last.
    • The Duct Tape needs to be applied on the bent propeller, in order to straighten it back to its normal position and allow the Helicopter to fly up.
    • The Gasoline Can needs to be used to fill up the fuel tank, which can be found on the side of the Helicopter.
    • The Player also has to find the Helicopter Manual beforehand to be able to pilot the Helicopter. If they don't and try to start the Helicopter without picking it up, something unexpected* will happen, ruining completely all the hopes of escaping with the Helicopter. Once the Manual has been taken in hand, it will disappear and a small Helicopter Icon will appear at the top right of the screen, with a message saying "You can now control a helicopter".
    • The final step to start the helicopter, once the propeller is fixed, the tank is full and the Manual has been "read" is to get inside the cockpit with the Helicopter Key in hand and press the "Engine Start" button to load the Helicopter Ending scene and successfully escape the House.


    Saturday, February 9, 2019

    Mechanical Engineering E-books & Workbooks

    This blog is for mechanical Engineering students by a student. As it not possible for every student to purchase quality books and study material.The purpose of this blog is to provide good and useful information about mechanical Engineering. Simply providing most useful information search by the mechanical engineering students like Mechanical eBooks, Workbooks, Mechanical Aptitude Questions, etc. You can support by sharing useful content with us.
    If you want to write quality knowledgeable blogs let us know in comment.


    Sunday, January 27, 2019

    How To Find Right Tonne Air Conditioner For Your Room?

    In the chilly summer days when the temperature is too high and your body is sweating like hell, everybody wants a cold space where they can relax and have a cold drink.
    But do you know how these things are still chilled in this hot summer or the restaurant where you are sitting, your office or your home?
    Exactly, it's because of the Air-conditioning (A.C.) System.
    Did you know that A.C. is not only used to cool your space, but it also used to warm your space.
    The main aim of air conditioning system is to supply and maintain desirable internal atmospheric condition for human comfort, irrespective of external condition.
    The factors which controls internal atmospheric conditions to produce desired human comfort conditions are temperature, humidity, purity and motion of air.
    Now, when you know little about the Air-conditioning (A.C.) System it's time to jump on our topic "How To Find Right Tonne Air Conditioner For Your Room?", to do so get ready with a pen, paper and measurement. we are going to calculate the right tonne air-conditioner for your room?

    We are going to calculate it with British Thermal Unit (B.T.U.).

    First Step: Measure the size of your room.

    Let's assume it's 20 feet wide and 30 feet long so,


    20 x 30 = 600 square feet
    It's 600 sq. feet area.

    Second Step: Multiply the area with some constants(to find the required BTU to cool or heat your                            room).

    If it's a bedroom, dining room etc. multiply the area with a constant 30.
    600 x 30 = 18000 BTU's
     If it's a kitchen, multiply the area with a constant 40 (because of extra heat emitted during cooking).
    600 x 40 = 24000 BTU's
     Third Step: Measure the height of your room(up to ceiling).

    For every extra feet above 8 feet you have to add 1000 BTU's
    Let's assume it's 10 feet high, so
    18000 + (2 x 1000) = 20000 BTU's
    "We humans are warm blooded and our body always radiate some heat to surrounding. That's the reason why on covering our body with a cold blanket after some time we feel warm. The blanket trapped the radiated heat in it's fur. Igloo house also work on same principle."

    Fourth Step: Add number of people in room.

    For every extra member above 2, you have to add 600 BTU's.
    Let's say there are five members then,
    20000 + (600*3) = 21800 BTU's
    "If you have an adult pet say a dog then add another 600 Btu's for him."

    Fifth Step: Now we are so close just convert the calculate Btu's in Refrigeration Tonne (RT).
    1 RT = 12000 BTU's
    Therefore,
    21800 / 12000 = 1.8 RT
    Its a ruff calculation there are some other factors too which affect:

    1) The average temperature of your city.
    2) Location and size of windows.
    3) Number of appliances (T.V., Refrigerator, Bulb, Fan etc.)
    4) Floor level i.e. on first floor, ground floor etc.

    By accounting these factors we can say that an A.C. in between 2 - 2.5 Tonne is best for above room.

    Saturday, November 17, 2018

    Different Type of Fluids in Your Vehicle

    Your car is essentially an assembly of mechanical systems and complex machinery operating in unison to propel itself, and you, on the road. These mechanical systems and machinery depend on various types of fluid, which allow these systems to operate properly. Without these fluids, these systems will fail quickly.


    See the source image

    Fluid categories:

    Every system in your car demands different kind of lubricant properties so there are different kind of fluids like Engine Oil, Engine Coolant, Transmission Fluid, Brake Fluid, Differential Fluid, Power Steering Fluid, Hydraulic Clutch Fluid, Window Washer Fluid.

    Work of Fluid:

    Engine-Oil-Icon  Engine Oil: It lubricates and cools the internal workings of your engine such as bearings, pistons, valves, timing chains, gears, pumps, seals and more.

    Engine-Coolant-Icon Engine Coolant: It lubricates the water pump, cools the engine and provides heating fluid to the climate control system.

    Transmission-Fluid-Icon Transmission Fluid: It lubricates and cools the internal workings of your transmission including gears, bearings, valves, pumps, seals and more.

    Brake-Fluid-Icon Brake Fluid: It lubricates brake valves, pistons and antilock braking system. Provides hydraulic pressure to power the braking system.

    Differential-Fluid-Icon Differential Fluid: It lubricates and cools the internal workings of your rear differential including gears, bearings, seals and more.

    Power-Steering-Fluid-Icon Power Steering Fluid: It lubricates and cools the power steering pump, valves, steering gear box, seals and more.

    Hydraulic-Clutch-Fluid-Icon Hydraulic Clutch Fluid: It provides hydraulic pressure which engages and disengages the transmission clutch system.

    Window-Washer-Fluid-Icon Window Washer Fluid: It provides a non-freezing cleaning solution for the windshield and headlights.

    Tuesday, November 13, 2018

    Human Comfort/Human Comfort Conditions

    Human comfort can be defined as that condition of mind which express satisfaction with the thermal environment.

    Thermal Exchange of human body:


    •  The human body like any other machines works best at a   certain temperature, it can not tolerate a wide range of   temperature. To maintain that temperature human body uses three different modes of heat transformation:
    1.  Evaporation
    2.  Convection
    3.  Radiation


    •  A human body feels comfortable when the heat produced     by metabolism of human body is equal to the sum of the   heat dissipated to the surrounding and the heat stored in   human body by raising the temperature of body tissues. It   can be written as:


    QM - W = QE ± QR ± QC ± QS


    • Here, Qm is metabolic heat produced by body,W is rate of working, Qm-W is heat dissipated to atmosphere,Qe is heat loss by evaporation, Qr is heat gain or loss by radiation, Qc is heat loss or gain by convection, Qs is heat stored in body.
    • The metabolic heat produced depends upon the rate of food energy consumption in the body. A fasting, weaker or sick man will have less metabolic heat production.
    • The heat loss by evaporation is always positive. It depends upon the vapour pressure difference between skin surface and surrounding air.
    • Qe becomes zero, when the surrounding air temperature is equal to the skin temperature. It cannot be negative because if the surrounding temperature is less than the skin temperature then skin do not absorb moisture from surrounding atmosphere.
    • The heat loss or gain by radiation (Qr) depends upon the mean radiant temperature. When mean radiant temperature is lower than the dry bulb temperature of air in the room, Qr is positive i.e. the body will undergo a radiant heat loss and vice-versa.
    • Mean radiant temperature is the average surface temperature of surrounding objects, when properly weighted and varies from place to place inside the room.
    • The heat loss by convection (Qc) is positive when the temperature of surrounding is lower then the temperature of body i.e. the heat will be lost by the body and vice-versa.
    • When Qe,Qr,Qc are high and positive and their sum is greater than (Qm - W), then heat stored in body is negative i.e. the body temperature falls down and the person feels cold.
    • A men gets fever when high internal body activities increase Qm  to such extent so that Qs become positive for the given Qe,Qr and Qc.
    • The ambient temperature for human body is 37℃ (at Qs=0). If the temperature of human body falls below 36.5℃ or rise above 40.5℃ it is dangerous.
    • To maintain this ambient temperature human body uses two mechanisms:
    1. Vasomotor Control : This control regulates the blood supply to the skin. When the human body temperature rises, then the vasomotor control increases blood circulation which increases conductivity of tissue. When the body temperature is falling down the vasomotor control decreases the circulation of blood which decreases the conductivity of cell.
    2. Sudomotor Control : This control regulates sweat production, whenever heat loss by Qr and Qc is negative due to high atmospheric temperature then only way to control body temperature or heat transfer is evaporation.

    Physiological hazards from Heat: 

    • In summer the surrounding temperature is always higher than human body temperature because of this the human body gain heat from surrounding by means of radiation and convection. Now, human body can release heat only by means of evaporation of sweat. When this system is unable to cope with the heat gain, several physiological hazards can occur.
    1. Heat Exhaustion: It is due to failure of normal blood circulation. The symptoms of heat exhaustion are headache, fatigue, vomiting, dizziness and abnormal mental reactions such as irritability. It does not cause any permanent damage and body rapidly recovers when person is placed in cool place.
    2. Heat Cramp: It results because loss of salt due to an excessive rate of perspiration. It causes pain in calf and thin muscle. It can be avoid by taking salt tablets.
    3. Heat Stroke: When the body temperature is rise above 40.5℃, it causes heat stroke and can leave permanent damage to brain or the person may enter in coma with imminent death. To avoid such condition, drink water at frequent intervals and rest at a cool place.
     Source: 1) A textbook of Refrigeration and Air conditioning by R.S.Khurmi & J.K.Gupta
                  2) Refrigeration and Air conditioning by R.K.Rajput.

    Saturday, November 10, 2018

    It's all about Drive Trains

    Drivetrains:


    It is the group of components which delivers engine power to the driving wheels.
    The components of a drivetrain are Engine, Transmission, Drive/Propeller shaft, Differential,Drive axle, Transaxle.

    Types of Drivetrains:

    There are four types of drivetrains 
    1. Rear-wheel Drive
    2. Front-wheel Drive
    3. All-wheel Drive
    4. Four-wheel Drive

    Rear-wheel drive:

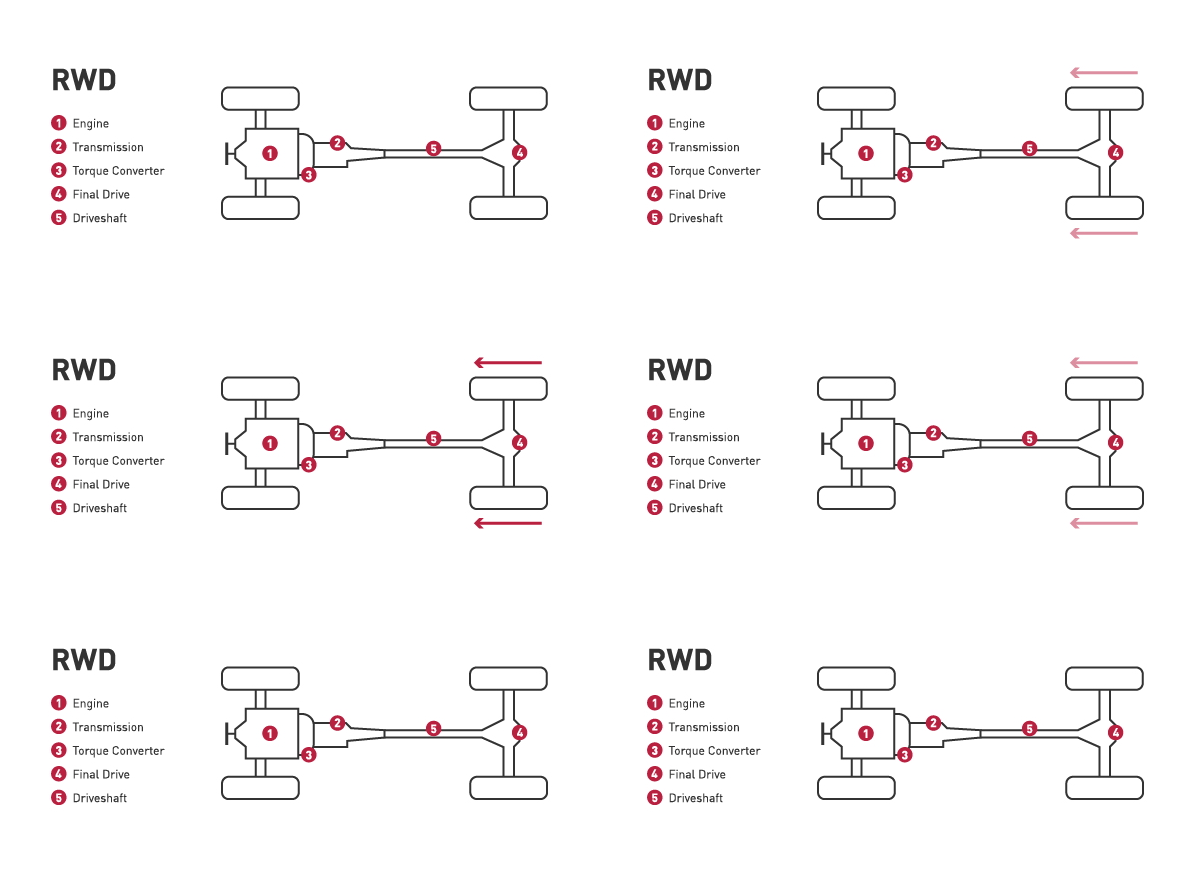
    • A rear-wheel drive system relies on the rear wheels to deliver the power. 
    • RWD is commonly found on trucks and performance vehicles, it gives needed traction with heavy loads and optimal handling on performance cars.
    • Drawback of rear-wheel drive is reduced traction on slippery roads; this might not be ideal for snowy climate.


    Rear-Wheel-Drive-Diagram

    Advantages:


    • Superior handling.
    • Exceptional braking.
    • Quick initial acceleration.
    • Excellent for performance driving.

    Disadvantages:

    • Not ideal for winter weather – poor traction in snow and ice.
    • Traction on wet roads not as good as FWD.

    Front-wheel drive:

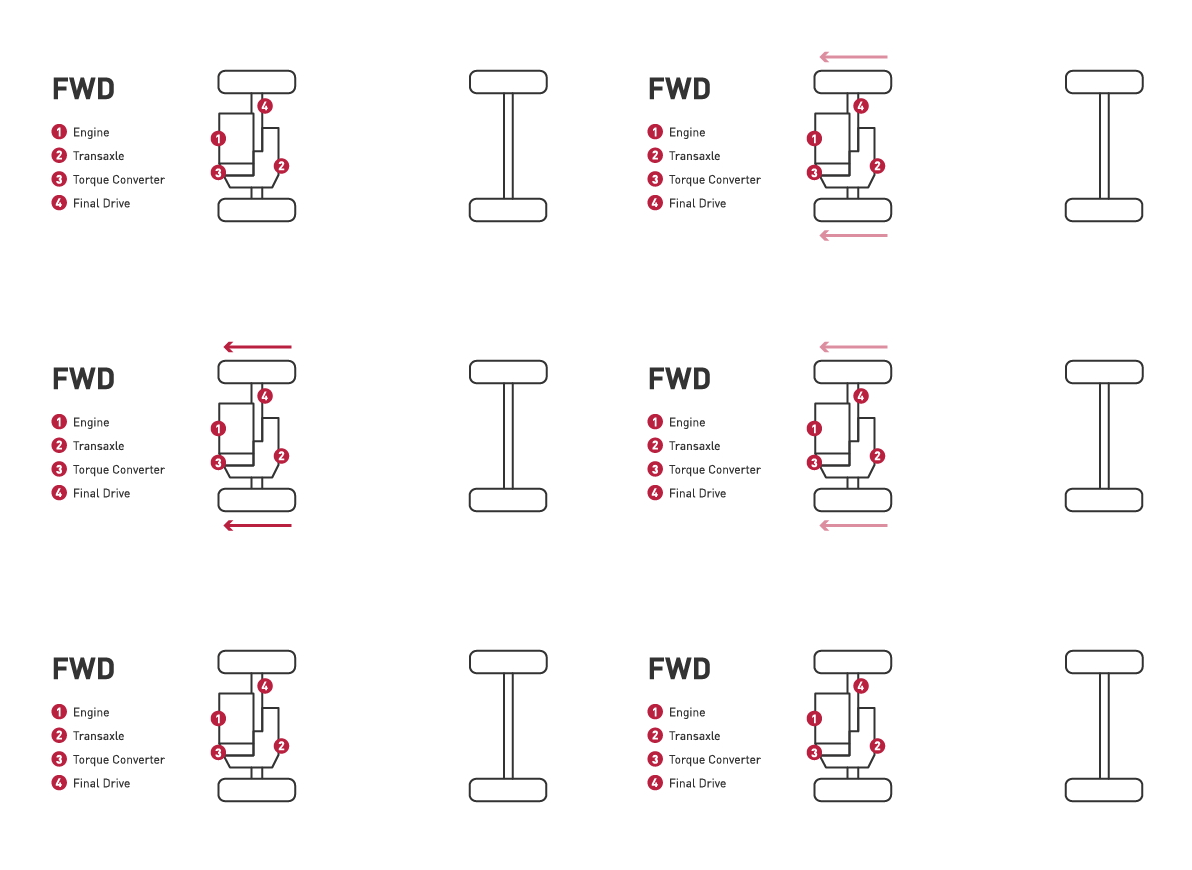
    • The majority of vehicles on the road today are using front-wheel drive system. In this system, the front wheels provide the power. 
    • All of the drivetrain components are located in the front of the vehicle which increases traction in the front wheels.
    • Vehicles with front-wheel drive are typically lighter, helping to improve gas mileage.
    Front-Wheel-Drive-Car-Diagram

    Advantages:

    • Fewer parts mean lower purchase price and repair bills.
    • Lighter weight helps vehicle achieve better gas mileage.
    • Better traction than rear-wheel drive.
    • With most of weight over front wheels, it’s balanced for traction.
    • Less aggressive handling is good for new and cautious drivers.
    Disadvantages:
    • Not as effective in low-traction situations like gravel and ice
    • Nose heavy makes it harder to handle in high speeds or with heavy loads.
    • Can cause understeer where front wheels lose traction and car drifts outside of the turn.

    Four-wheel drive:

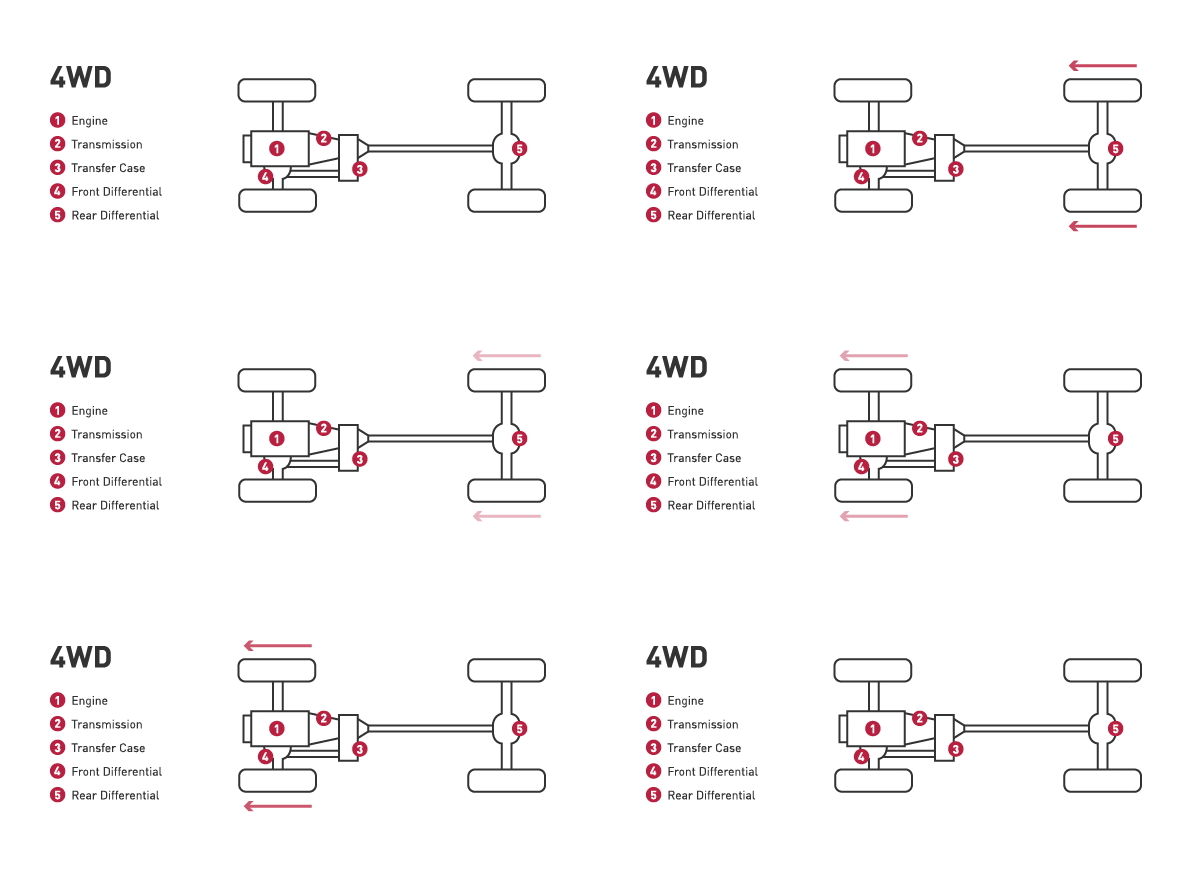
    • A four-wheel drive system have two drive shafts and a transfer case to deliver power to all four wheels. Today’s 4WD systems are either full-time or part-time.
    • In a full-time system, the vehicle automatically switches between two-wheel and four-wheel drive while a part-time system requires the driver to manually engage the four-wheel drive system.
    4WD-Car-Diagram

    Advantages:

    • Excellent for towing trailers or big loads.
    • Ideal for serious off-roading, crawling over rocks and moving through mud.
    • Powers through deep snow.
    • Delivers the traction needed for climbing hills.

    Disadvantages:

    • More expensive than FWD and RWD due to extra parts.
    • Lower gas mileage due to heavier drivetrain system.
    • Have to remember to engage it in a part-time system.


    All-wheel drive:

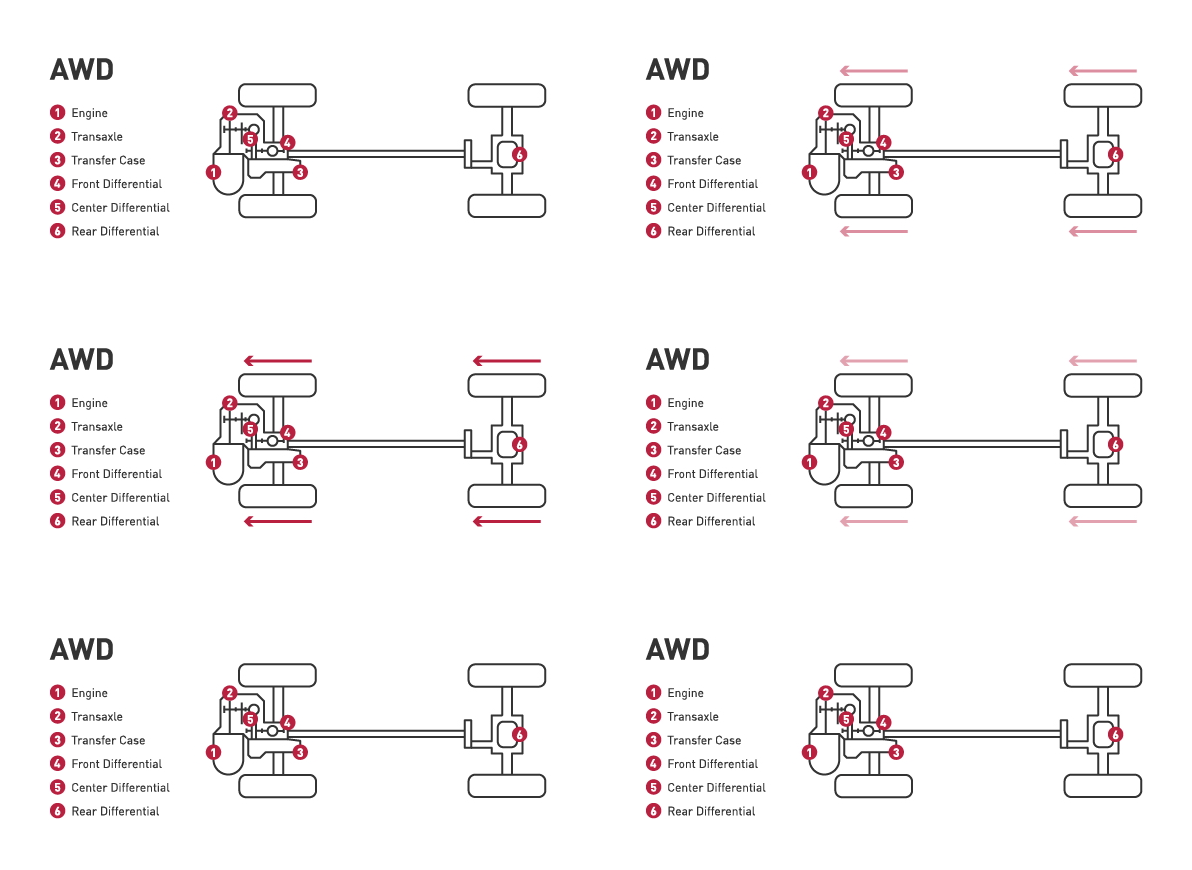
    • AWD delivers power to all four wheels. Most all-wheel drive systems are always on, using sensors to determine which wheel needs power.
    • However, be aware that systems vary and some all-wheel drive setups stay in two-wheel drive most of the time and only go into all-wheel drive mode when the sensors detect the vehicle is losing traction.
    All-Wheel-Drive-Car-Diagram

    Advantages:

    • Better acceleration.
    • Improved traction in snow and on wet roads.
    • Always on – don’t have to think about engaging the system.

    Disadvantages:

    • More expensive with more parts than FWD and RWD.
    • Worse gas mileage due to vehicle being heavier.
    • Can cost more to repair than a FWD or RWD vehicle.